
Welcome to this page! If you’re here, it means you’re looking for an easy guide on how to make a blog and make some cash from it. I’ve received lots of emails asking about starting a blog, so it’s about time we dive into it.
But, before we begin our blogging adventure, let’s tackle a common question.
What will I need to start a Blog?
Creating a blog is as easy as pie! All you need are these four simple things:
- A Web Address or Domain Name: This is like your blog’s home on the internet, such as www.highschoolsvibes.com.
- Web Hosting Account: Think of this as your blog’s storage space on the internet, where all your cool content hangs out.
- WordPress Software: It’s like your blog’s magic wand – it helps you easily manage all your blog posts and make your site look awesome.
- Just 60 Minutes of Your Time: Yup, that’s all it takes to get your blog up and running. And guess what? You only need basic computer skills, like copying and pasting!
Even if you’re 60% a blogger already, knowing how to put together great sentences and navigate the internet, you’re good to go. Having social media accounts like Facebook, Twitter, TikTok, etc., is a bonus. And don’t worry if English isn’t your strong suit – Grammarly Premium can help fix any grammar hiccups in your articles.
This step-by-step guide is tailored for everyone, whether you’re a total newbie or a seasoned blogger. I’ll walk you through each stage with lots of pictures and short videos to make everything crystal clear.
Got questions or feeling a bit stuck? Send me a message on WhatsApp or email, and I’ll do my best to help you out. Let’s make your blogging journey a breeze!
Introduction to blogging
If you already know what a blog is, great! Skip the intro and let’s get started on creating your own blog.
But what exactly is a blog?
No worries if you’re not sure about the term “blog” or “blogging.” I didn’t know what it meant a few years ago either. Simply put, a blog is like a website where people share information through posts. These posts can cover a wide range of topics, just like the one you’re reading now, which falls under the Technology category.
Now, who is a blogger?
A blogger is someone who writes and shares articles (or blog posts) from their personal perspective. They might talk about things like politics, policies, businesses, lifestyles, or other topics that interest them. Some bloggers also write to connect directly with their readers, and that’s why most blogs have a “comments” section where readers can interact with the blogger.
Why should you become a blogger?
One cool thing about having a blog is that it lets you directly connect with your readers. This connection helps you share ideas with people who are interested in the same things you are (your niche). It also helps you build trust with your readers, and trust can open the door to making money from your blog.
The internet is a massive place with billions of people, and it’s getting bigger every day. This means more potential readers for your blog. You might want to be a blogger to promote your business online. For example, if you sell things online, you can write blog posts about how your products are used and include links to those products.
Now that you understand what blogging is all about, let’s dive into creating your own blog!
Step 1: of how to start a blog – Pick a blog name
To guide you in choosing the name and focus of your blog, consider the following questions: Who is your intended audience? What would you like to name your blog? What specific area will your blog concentrate on? What topic are you passionate about?
If you’ve already decided on a niche and a fantastic blog name, you can proceed to secure a domain here.
Selecting the right name and niche for your blog can be a bit tricky. Let’s break it down. But first, what exactly is a niche?
A niche is essentially the category or theme of your blog, determining the specific area your blog will emphasize. This also defines your target audience – the people who will visit your site and read your blog.
Popular blog niches include education, travel, gaming, photography, health, lifestyle, technology, and cooking. For instance, if you excel at making pastries, you might consider building your blog around the cooking niche. As seen in this very blog you’re reading, the focus is on technology and education.
Here are a few tips to help you choose the right niche for your blog:
- Follow Your Passion: Opt for a topic that you are genuinely passionate about – something you enjoy doing or wish to explore further.
- Audience Attraction: Keep in mind that your blog is for real people, not just computers. Choose a topic that naturally interests a broad audience. You can use tools like Google Trends to gauge the popularity of your chosen topic on social media and message boards.
- Confidence Matters: While expertise is helpful, you don’t have to be an absolute authority on your chosen topic. What’s crucial is having an original perspective and a willingness to learn and share. For example, even if you’re not a cooking expert, you can still blog about your journey in learning how to cook, sharing details and improvements with your audience.
If credibility is vital for your blog, particularly in areas like politics and government policies, consider building your blog by conducting interviews with political leaders and industry players. This can enhance the credibility of your content.
Step 2: Put your blog online
Great job on selecting your blog’s niche and deciding on a name! Now, let’s move on to choosing a domain, blog hosting, and blog management software, but don’t worry, it’s simpler than it sounds. Following these steps will make it a breeze, and the best part is, you’ll get everything in one package through this tutorial. You’re on your way to mastering how to start a blog!
What’s a Domain Name?
Your domain name is what people type into their browser to visit your website. For example, highschoolsvibes.com is my domain name. It typically costs between $8 and $20. Keep it simple and memorable, and avoid spaces or other punctuation.
Use the box below to check if your desired domain is available. Remember, dashes are the only allowed punctuation.
Is your domain taken? No worries, you can pick another or use an AI tool for ideas.
Understanding Web Hosting:
Web hosting is like renting space online to store and deliver your blog’s files. It enables people to access your blog from anywhere. Hosting also includes the content management software (CMS) needed for blog management. I’ll show you how to use WordPress, a user-friendly and customizable CMS.
For beginners, I recommend Hostinger International or NameCheap hosting. Why? Because they offer a reasonably priced package with:
- Free Domain: You don’t have to buy a domain; they provide one for free.
- Thirty-day Money-back Guarantee: If unsatisfied within 30 days, you can get a refund.
- Managed WordPress: Free, optimized, and easy-to-use WordPress software.
- Free SSL: The padlock in your browser ensures your blog is secure.
- Reliability: Hostinger has been around since 2004 and has a solid reputation.
- 24/7 Support: Available via live chat for any assistance you may need.
Ready to start? Click the button below to get your all-in-one hosting package at Hostinger.
Start Your Blog with Hostinger
Hey there! If you’re ready to start your own blog, I’ve got a step-by-step guide for you. And guess what? By following this tutorial, you’re helping keep this website running so I can keep assisting you and many others for free. If you ever run into any trouble setting up your blog, don’t hesitate to reach out – I’m here to help!
Now, let’s get started on purchasing the right hosting package. It’s super simple, even for beginners!
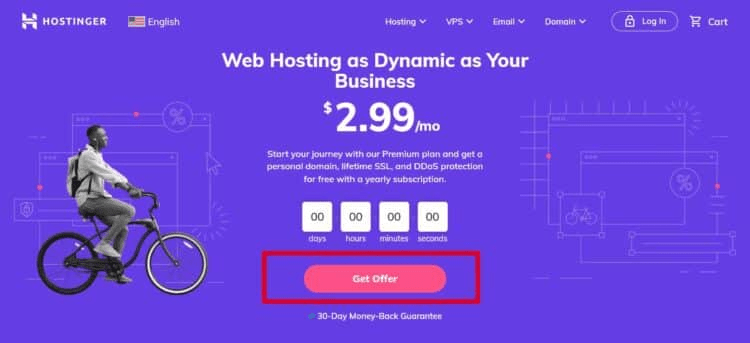
Step 1: Grab a Great Deal
Click here to get an awesome rate of $2.99 per month from Hostinger. Once you’re on their page, hit “Get Offer.“
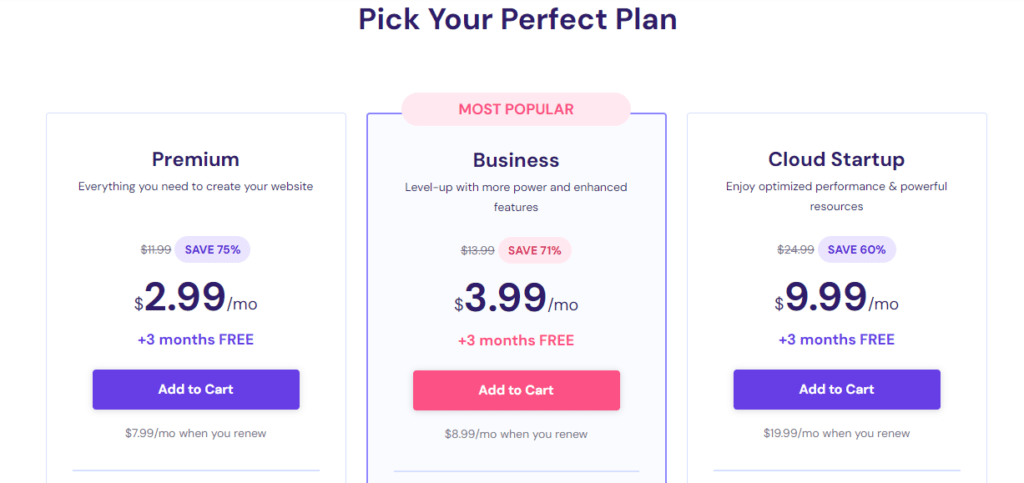
Step 2: Choose Your Hosting Plan
I recommend going for the “Premium Shared Hosting” – it even comes with a free domain name!
Step 3: Select Subscription Period
On the next page, pick the hosting subscription period. I suggest going for the longer one, like 48 months (that’s four years).

Step 4: Register Your Account
If this is your first time on Hostinger, create an account easily with either Facebook or Google.
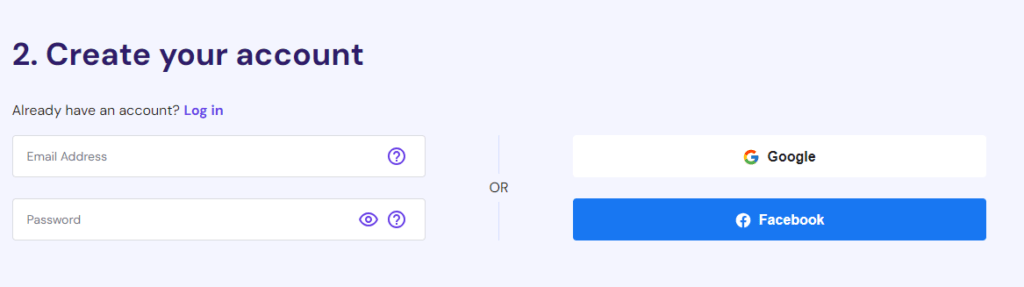
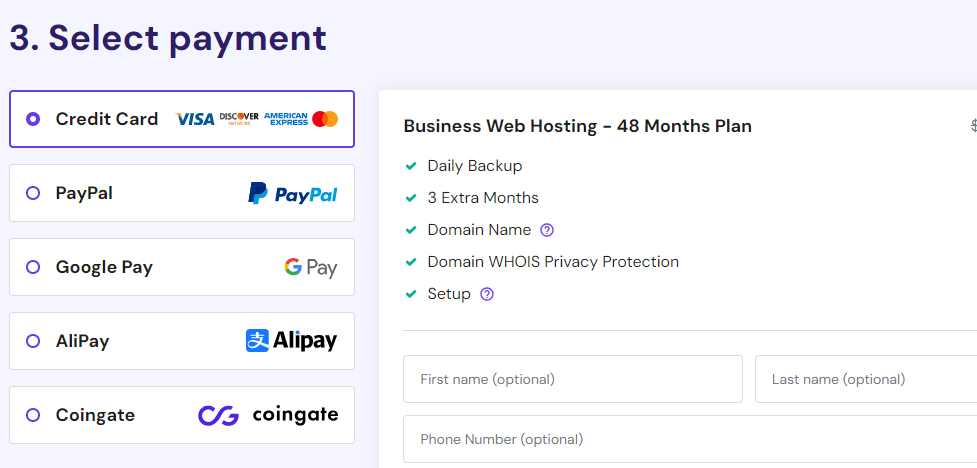
Then, choose your preferred payment method from options like credit cards, PayPal, Google Pay, AliPay, or Coingate.
After Purchasing: Setting Up Your Blog
Once you’ve got your hosting package, you’ll be redirected to Hostinger Hpanel. Set a new password for security.
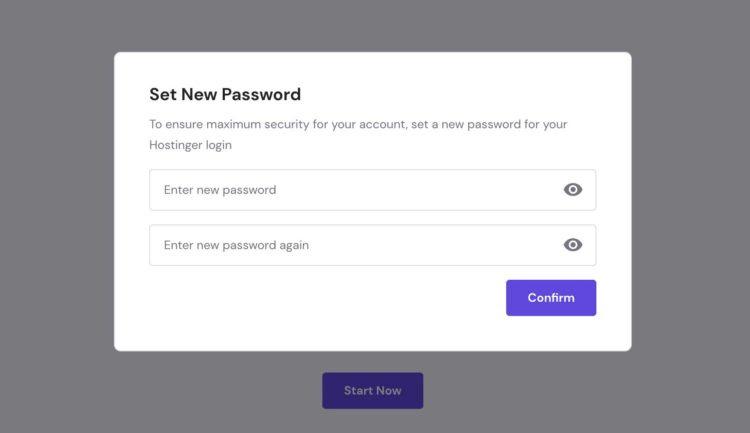
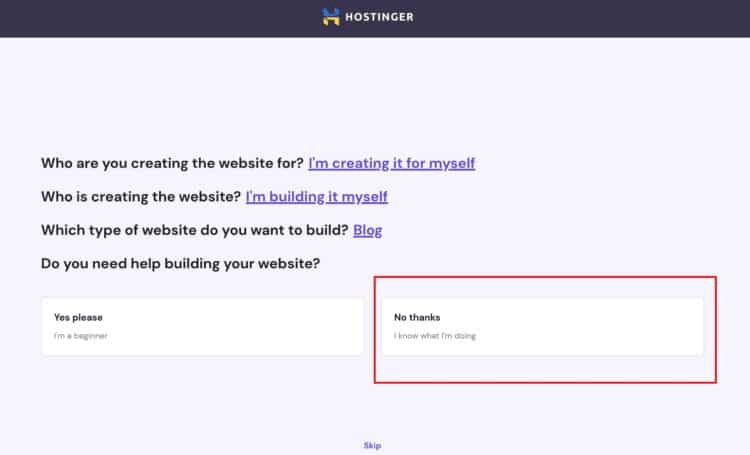
- Click “Start Now” and choose “I’m creating it for myself” and “I’m building it myself.”
- Select “Blog” as the type of website you want to build.
- When asked if you need help building, say “No Thanks.”
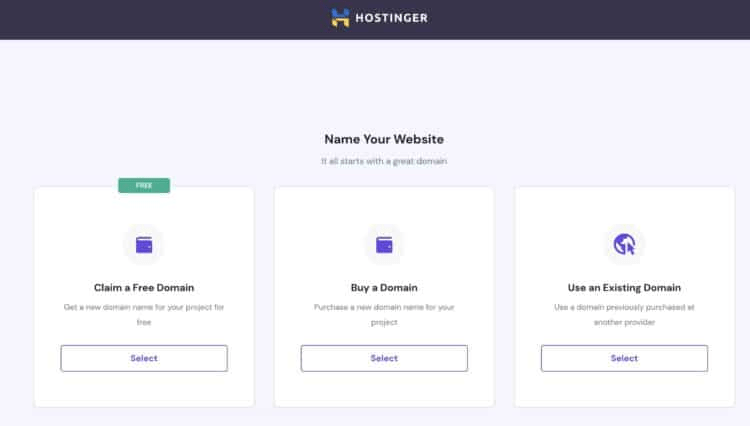
Claim Your Free Domain:
Remember, you’ve got a free domain with your package. Choose “Claim a free domain name.”
Fill in Your Details:
Provide your location, business address, personal address, etc. Then, hit “Finish Registration.”

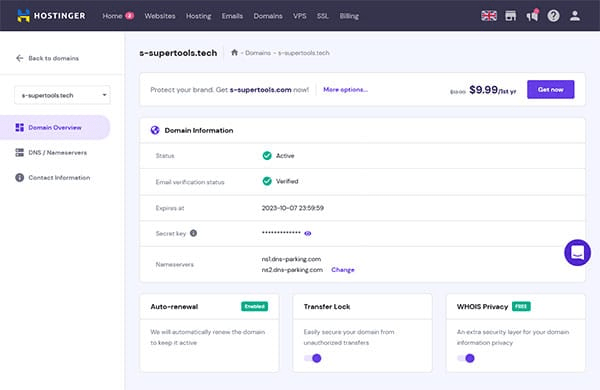
Connecting Your Domain:
Your domain might take up to 48 hours to be accessible worldwide. Once it’s ready, your dashboard will guide you in connecting it to your hosting account. Click “Add Website” and choose your hosting account.
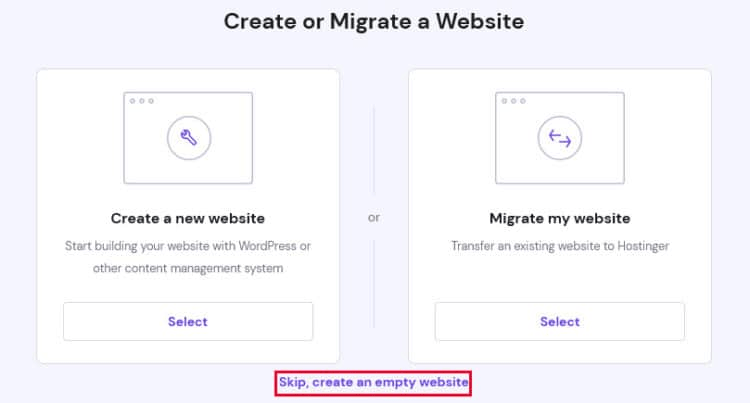
Final Steps:
Hostinger offers an installation helper, but you can skip it and select your purchased domain. Click “Finish,” and congratulations – your domain is linked to your hosting server!
Check Your Website:
Test your website with the “View Website” button. Make sure it has a padlock symbol on the address. If not, wait a bit, and if the issue persists, let me know in the comments.
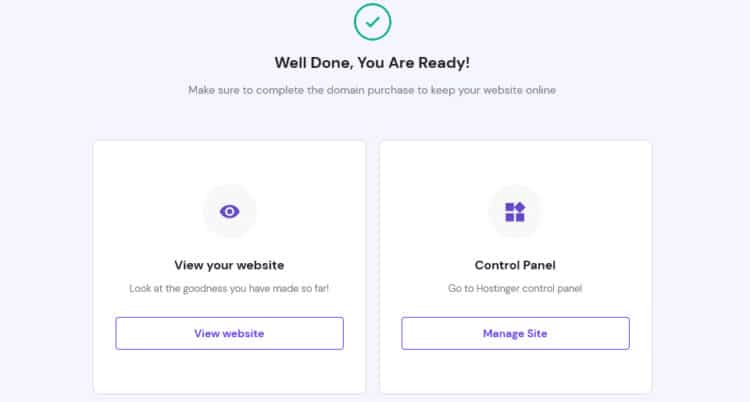
Now, click “Manage Site.” You’ll be taken to the dashboard where you can control your website’s hosting, domain, and more. Happy blogging!
Need help installing your blog? Get help here.
Step 3: Install the WordPress Blogging Platform
You’re making great progress! Now, let’s dive into setting up your WordPress, a powerful tool to manage your website easily, even if you’re not a tech whiz. Follow these simple steps:
- On your dashboard, find the website drop-down button on the left, select WordPress, and click install.
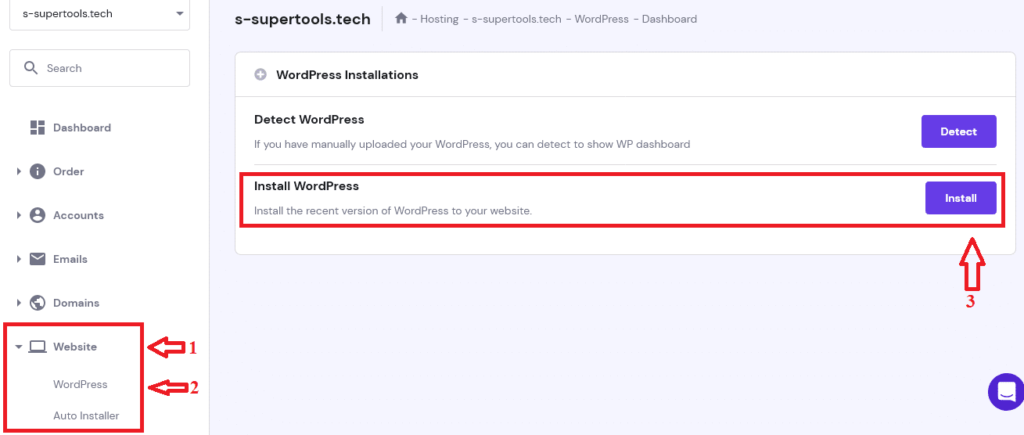
- WordPress is like a superhero for your website, allowing you to control crucial aspects without any coding knowledge. You can choose from hundreds of designs to make your site look amazing.
- Next, fill in the required information on the installation page. Enter your blog’s title (you can change it later), your username, and the password you’ll use to manage your website.

- Click on ‘Advance’ and ensure your domain protocol is set to https:// instead of http://. This is crucial to prevent mixed content issues later. Don’t touch anything else in the advanced section. Click ‘Next’ to proceed.
5. On the next page, leave everything as default and click ‘Install’.
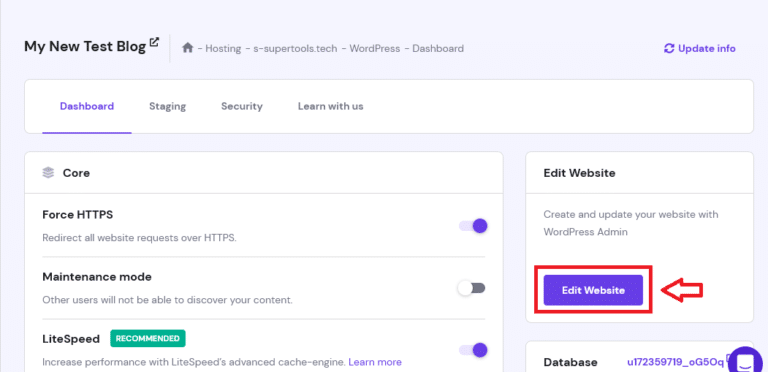
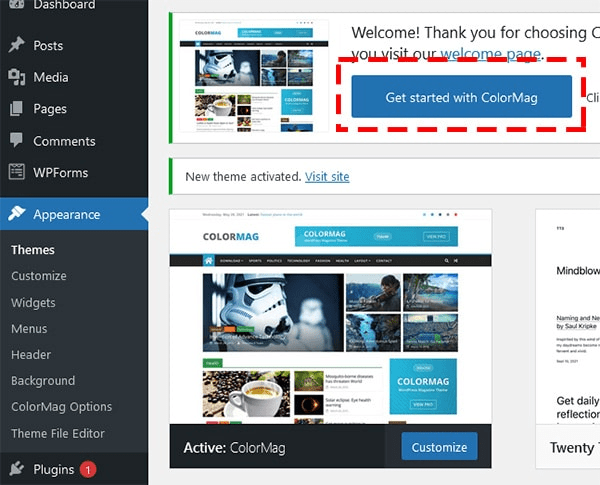
6. Once you hit install, the system will automatically set up WordPress for you. When it’s done, click the “Edit Website” button on the right to log in to your blog’s administrator area.
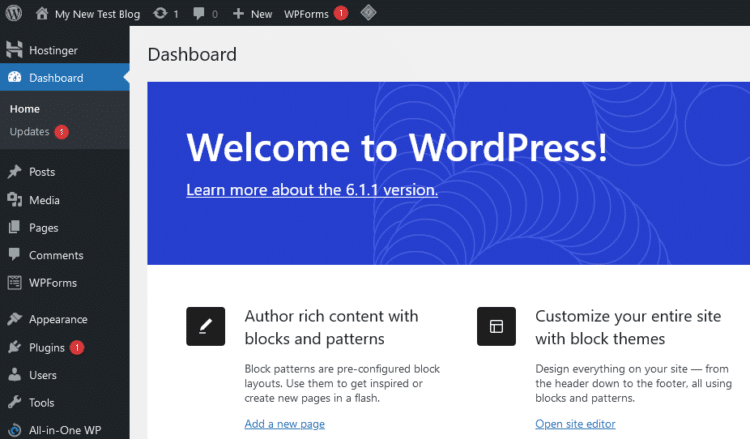
- If you see a dashboard similar to the image above, congratulations! You’ve successfully installed WordPress. Now, it’s time to customize your WordPress to make it uniquely yours.
You’re on your way to creating an awesome blog. If you have any questions or need further assistance, feel free to ask.
Blog Theme – Changing your blog design
Now that you’re on the WordPress dashboard, let’s spruce up the appearance of your website. Follow these steps to change the default WordPress theme:
- Open a new browser tab and enter your domain name. You’ll see the default WordPress theme – at the time of writing, it was twenty-twenty-three (2023) on WordPress 6.1.1.
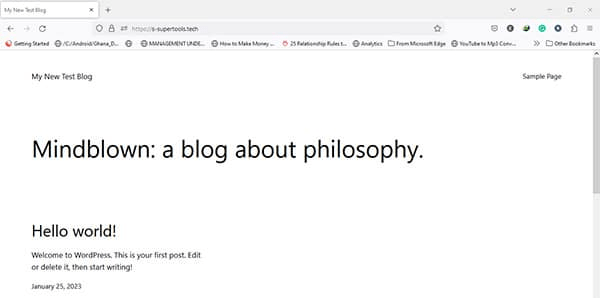
- As you can see, the default theme might not be the most stylish, so let’s switch it up to give your website a professional look. To change your theme, go to Appearance -> Themes -> Add New. Hover over the theme you like, and click Install.
- Once the installation is complete, hit Activate. Now, open another tab, enter your blog’s domain name, and witness the transformation!

- Here’s the cool part: WordPress offers a collection of over 2,000 free themes for your blog or other websites. Feel free to explore these options and choose the one that best suits your style. If you’re looking for something more advanced, you can also check out premium themes in the WordPress library or from third-party sources like ThemeForest.
Changing your theme is a fantastic way to make your blog stand out and reflect your unique personality. Enjoy the process, and if you have any questions or need further guidance, I’m here to help.
What are WordPress premium themes?
Choosing between a free and premium WordPress theme? Let’s break down the factors to consider:
Why Consider a Premium Theme:
- Support and Updates: Premium themes often come with reliable support and frequent updates to keep your website running smoothly.
- Premium Plugins: Many premium themes include premium plugins bundled with the purchase, adding valuable features to your site.
- Investment Worth: While free themes are sufficient for some, premium themes offer added benefits that may justify the cost.
Factors to Consider for Premium Themes:
- Pricing: Compare the price of the premium theme with similar options to ensure it’s worth the investment.
- Design: Choose a theme that complements your blog’s content, prioritizing simple designs that enhance each blog post.
- Features: Look for features like a drag-and-drop builder, premade layouts, and reliable customer support.
- Responsiveness: Ensure the theme is responsive, adapting to various screen sizes, as over half of website traffic comes from mobile devices.
- User Reviews: Read reviews from others who have used the theme to gauge its performance and support.
Pro Tip: The success of your blog doesn’t hinge on whether you choose a premium or free theme. Content quality and determination are key. Choose a theme, whether free or premium, with positive user ratings and community support.
For this tutorial, I’ll use the free ColorMag WordPress theme. You can opt for the free version as it provides everything needed for a successful blog. Install and activate ColorMag or any other free theme available on your dashboard.
How to Install ColorMag Theme:
- After installation, click on “Getting Started with ColorMag.”
- Choose your preferred layout and click “import.”
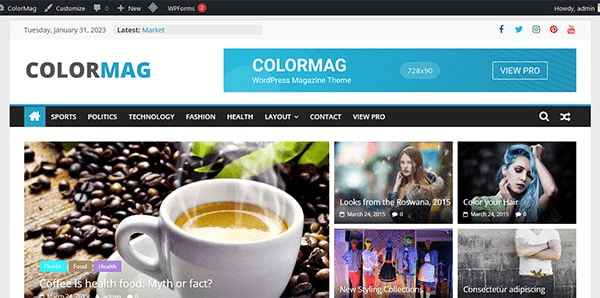
Post-Installation:
- Visit your site to see the new theme with menus, widgets, and sample posts, pages, and categories.
- To further customize your blog, delete demo content (if not needed) while keeping the layout.
- Conduct page customization for a more outstanding blog appearance.
By following these steps, you’ve successfully changed your WordPress theme and installed demo content. Now, let’s make your blog uniquely yours through customization!
Customizing Your Blog Appearance
Great job getting your blog started! Now, let’s add a personal touch and customize your blog’s appearance:
1. Change Website Permalinks:
Permalinks are vital for creating user-friendly URLs. Follow these steps to make yours clean and simple:

- Go to Settings > Permalinks in the admin dashboard.
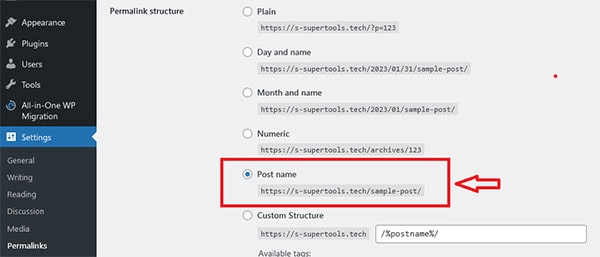
- Select the “Post name” radio button and click “Save Changes.”
- Now, your blog post URLs will look neat and include only the article title.

2. Customize Logo, Icon, Title, and Tagline:
Give your blog a unique identity with a logo, site icon, title, and tagline.
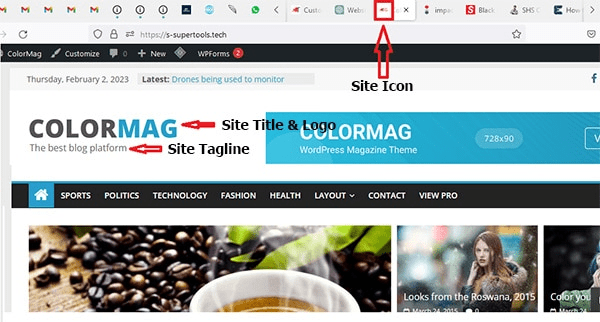
- Navigate to Appearance > Customize > Header > Site Identity.
- Add your logo, site icon, and customize the title and tagline.
3. Customize Footer Section, Copyright Tag, and Date:
Tailor the footer section to match your style. Note that some aspects may be limited in the free version of ColorMag.
- Go to Appearance > Customize > Footer > General.
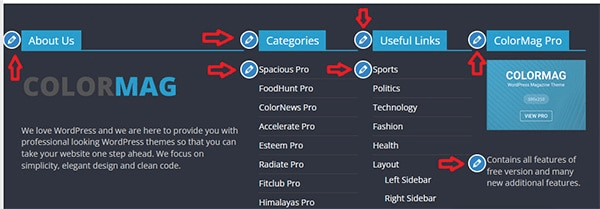
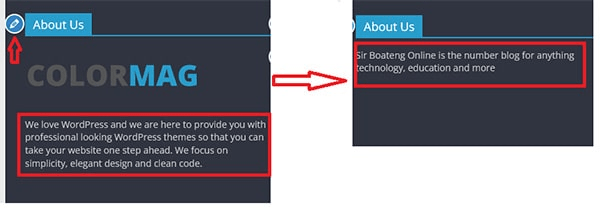
- Use the pencil icon to edit individual footer widgets, including About Us.
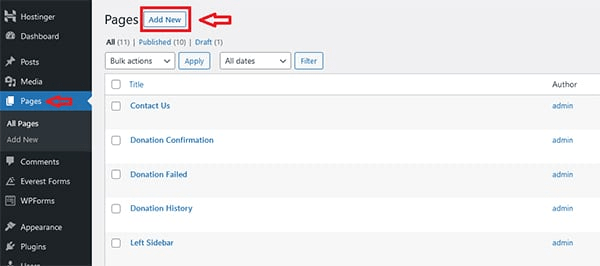
4. Add Important Website Pages:
Create essential static pages that provide vital information to your visitors. These pages include:
- About Me/Us: Share your story, mission, and motivation.
- Contact Me/Us: Provide contact information and links to social media profiles.
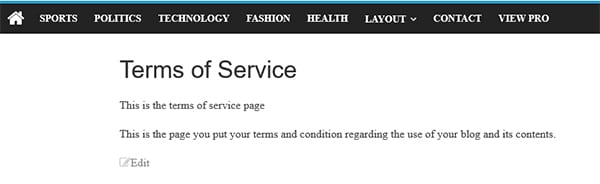
- Terms of Service Page: Generate a TOS using freeprivacypolicy.com.
- Privacy Policy Page: Create a privacy policy using freeprivacypolicy.com.
- Disclaimer Page: Generate a disclaimer using disclaimergenerator.net.
These pages ensure transparency, legal compliance, and user trust on your blog.
By following these steps, you’ve added a personal touch to your blog, optimized permalinks, and included crucial pages. Your blog is now not only visually appealing but also user-friendly and legally compliant. Keep up the great work! If you have any questions or need further guidance, feel free to ask.
5. Adding Your First Blog Post – How To Start a Blog
Congratulations on reaching this point in creating your blog! You’ve accomplished a lot, and now it’s time to add some valuable content to your website. Here’s how to create your first blog post in WordPress:
1. Delete Demo Blog Posts:
Since we’re starting from scratch, delete the demo blog posts that came with the theme. Select all posts, click on “Bulk Action,” and choose “Move to trash.”
2. Add a New Blog Post:
- Click on the “Add New” button at the top of the screen.
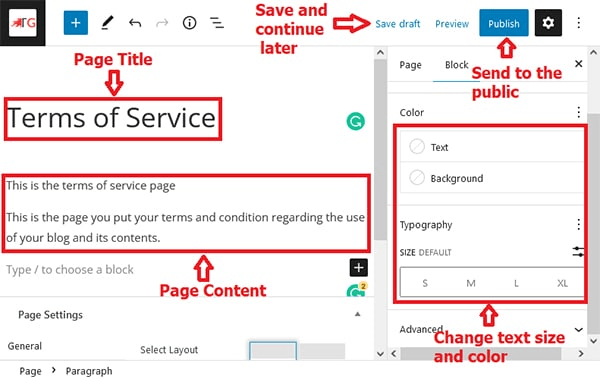
- In the “Add New Post” screen, enter a title for your post in the “Enter title here” field.
- Add your content to the text editor below. This editor allows you to format text and add media like images and videos.
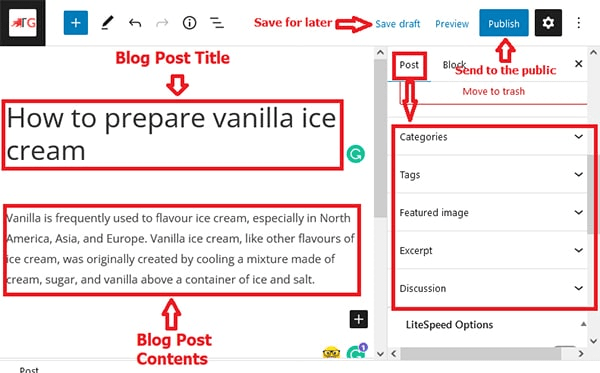
3. Choose Post Format:
- WordPress provides various post formats (Standard, Image, Gallery, Video, etc.) on the right pane. Choose the format that suits your content.
4. Customize Post Settings:
- On the right side, you can change text size, text color, and background color.
- Choose or create post categories and tags.
- Decide whether to allow comments and upload a featured image. The featured image is crucial for Google Search results.
5. Preview and Publish
- Before publishing, preview your post by clicking the “Preview” button.
- Save your article as a draft if you want to edit it later.
- When ready, click the “Publish” button on the right side.
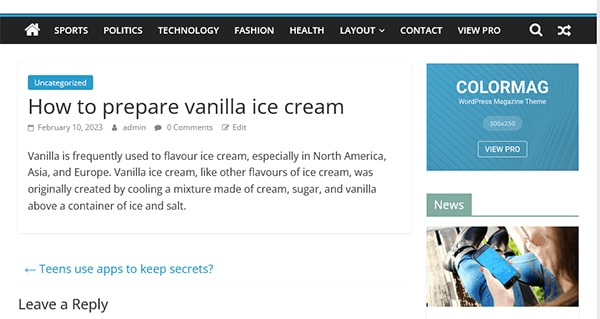
6. Celebrate Your Published Blog Post:
- Congratulations! You’ve successfully added a new post to your WordPress blog.
- Repeat these steps to add more blog posts as needed.
You’ve now mastered the art of creating and publishing blog posts on your website. Your blog is well on its way to becoming a valuable resource for your audience. Keep up the great work, and if you have any further questions or need assistance, feel free to ask.
6. Promote and Grow Your Blog Audience
Congratulations on launching your WordPress blog! Now, let’s focus on getting the word out and attracting readers. Here are effective strategies to promote your blog and build a loyal audience:
1. Create Great Content:
- Craft engaging, informative, and error-free content.
- Understand your audience’s interests and tailor your content to meet their needs.
2. Be Consistent:
- Stick to a posting schedule to maintain a consistent presence.
- Aim for at least 2-3 new posts per week, adjusting based on your niche and audience.
Need help installing your blog? Get help here.
3. Use Multiple Platforms:
- Leverage social media for promotion but don’t rely solely on it.
- Explore other platforms like email newsletters, guest blogging, social bookmarking, forums, and consider paid advertising sparingly.
4. Engage With Your Audience:
- Actively respond to comments on your blog.
- Interact with other bloggers in your niche through guest posts and social media sharing.
- Build a community of loyal readers through consistent engagement.
5. Optimize for Search Engines (SEO):
- Use SEO tools like Yoast, Rank Maths, or All-in-One SEO for on-page optimization.
- Conduct keyword research and select specific, relevant keywords.
- Include keyword-rich titles and descriptions in your posts.
6. Choose Keywords Carefully:
- Use specific and relevant keywords for better visibility.
- Avoid overly general keywords that make it difficult for readers to find your blog.
7. Promote Your Blog:
- Share your blog links on social media platforms.
- Write guest posts on other blogs to expand your reach.
- Submit your blog to relevant directories for increased visibility.
8. Stay Strategic and Consistent:
- Consistency is key to building a blog audience.
- Strategically create content, engage with your audience, and optimize for search engines.
By implementing these strategies, you’ll enhance your blog’s visibility, attract more readers, and establish a strong online presence. Remember, building a successful blog takes time and dedication, so stay committed to your goals. If you have any questions or need further guidance, feel free to ask.
7. How to Make Money from Your Blog
Congratulations on setting up your blog! Now, let’s explore the various ways to monetize your blog and turn it into a profitable venture. Keep in mind that while blogging offers great potential for income, it takes time and effort to see consistent earnings.
Need help installing your blog? Get help here.
Here are some effective monetization strategies:
1. Sell Advertising Space:
- Place banner ads, text links, or sponsored posts on your blog.
- Banner ads, displayed in designated spaces, can be sold on a CPM (cost per thousand impressions) basis.
- Text links, another form of advertising, are sold on a CPC (cost per click) basis.
- Sponsored posts are content created specifically for advertisers and sold on a CPM basis.
2. Sell Affiliate Products:
- Promote relevant products within your niche and earn a commission on every sale.
- Join affiliate networks like Commission Junction or ShareASale to access various programs.
3. Sell Products and Services:
- Offer your own products or services directly on your blog.
- Use methods like setting up an online store, using PayPal, or third-party services like Shopify and Amazon.
4. Sell Digital Downloads:
- Monetize your blog by selling digital products like e-books, music, or software.
- Set up a reliable payment system to facilitate purchases without the need for a physical store.
5. Sell Memberships:
- Create exclusive content and offer membership subscriptions for additional benefits.
- Provide members with exclusive access, discounts on products/services, and unique perks.
Remember that the key to successful monetization is diversity. Explore various methods, track their performance, and choose the ones that align with your blog’s goals and audience. It’s important to build a loyal readership before expecting substantial income. Consistency, quality content, and strategic promotion will contribute to the long-term success of your blog.
Feel free to ask if you need more guidance or have specific questions about monetizing your blog. Happy blogging and best of luck with your journey to profitability!
Congratulations on reaching the end of this comprehensive guide! Starting a blog is an exciting journey, and with your dedication, it’s possible to create a successful online presence. Remember that success in blogging requires time, effort, and continuous learning.
Need help installing your blog? Get help here.
Here’s a quick recap:
- Determine Your Niche: Choose a niche that aligns with your interests and expertise.
- Pick a Domain Name: Select a unique and memorable domain name for your blog.
- Choose a Hosting Provider: Opt for a reliable hosting provider like Hostinger to ensure your blog’s performance.
- Install WordPress: Use the easy installation process to set up WordPress on your hosting platform.
- Customize Your Blog: Select a theme, customize settings, and create essential pages like About Me, Contact, Privacy Policy, and more.
- Create Quality Content: Develop engaging and informative content that resonates with your target audience.
- Promote Your Blog: Use various platforms, including social media, email newsletters, and forums, to promote your blog and engage with your audience.
- Optimize for Search Engines: Implement SEO strategies to improve your blog’s visibility on search engines.
- Monetize Your Blog: Explore different monetization methods, such as selling advertising space, affiliate marketing, selling products and services, digital downloads, and memberships.
- Stay Consistent: Consistency is key to building and retaining your audience. Stick to a posting schedule and engage with your readers regularly.
- Seek Help if Needed: If you encounter challenges or need personalized guidance, don’t hesitate to reach out for assistance.
Starting a blog is a journey, and your commitment will be the driving force behind its success. Embrace the learning process, adapt to changes, and enjoy the fulfillment of sharing your passion with the world.
Need help installing your blog? Get help here.
If you ever have more questions or need assistance along the way, feel free to reach out. Happy blogging, and may your journey be filled with growth and success!
